
Many businesses still use legacy windows applications. They’re difficult to manage, update, and control. One of my previous client’s had built a claims system in-house. They struggled to update it and over time it required more and more resources to run. This meant forced upgrading of employee computers. Disaster Recovery was another big issue. It wasn’t designed to work outside of the corporate network, so even if the databases were online after a disaster, no one could easily run the application. Their idea was to create a VM to host this application and then force the user to connect with a VPN on a laptop that was built for this purpose. The idea wasn’t terrible, but it counted on an employee taking their laptop as they are running from a natural disaster. I’d give that about a 35% chance of success.
In this article, I will present a much more elegant solution to all of these issues.
Azure RemoteApps To The Rescue
Azure RemoteApps is a remote OS application platform, much like remote desktop. The big difference is that the user only sees the applications that are published. In fact, it appears as if the application is actually running on the user’s local machine. Truthfully, it’s actually running in a remote virtual machine and streaming the screen and events data to the user.
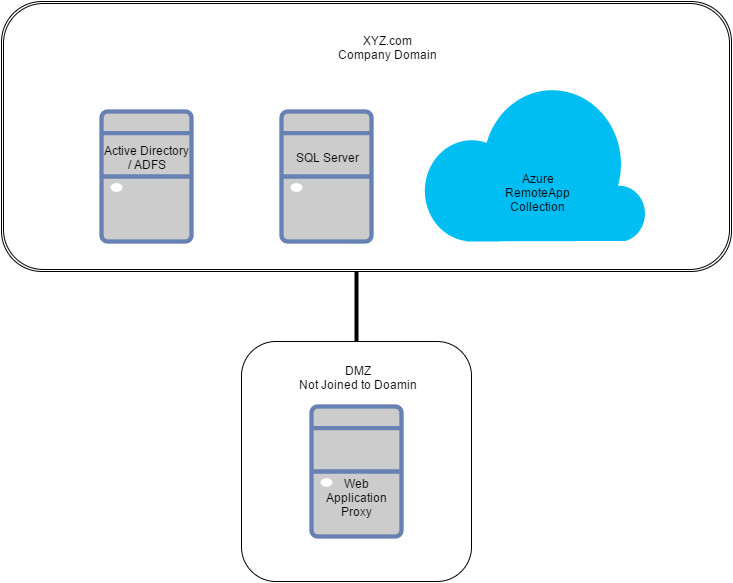
Let’s start with the basics of how it works when integrated into a domain. Below is a list of required servers/software using the Windows Server 2012 R2 platform:
- Active Directory (setup with a custom domain, e.g. xyz.com)
- Active Directory Federated Services
- Web Application Proxy
- An Azure Virtual Network
- Azure Active Directory Connect
- Azure Active Directory (setup with the custom domain)
- Azure Remote App Collection
- Azure RemoteApp Client software (available for Windows, IOS, and Android)
For my demo environment I added a SQL Server that the custom Windows application will query using Windows authentication. Here’s a diagram of my VM setup.
The way it works is that a user comes in through either the internet or the corporate network using the RemoteApp client software. After putting in an email address, he or she is redirected to the Web Application proxy server for full Active Directory authentication. Next the client app shows the published applications. Now the user can open the application. See the images below:
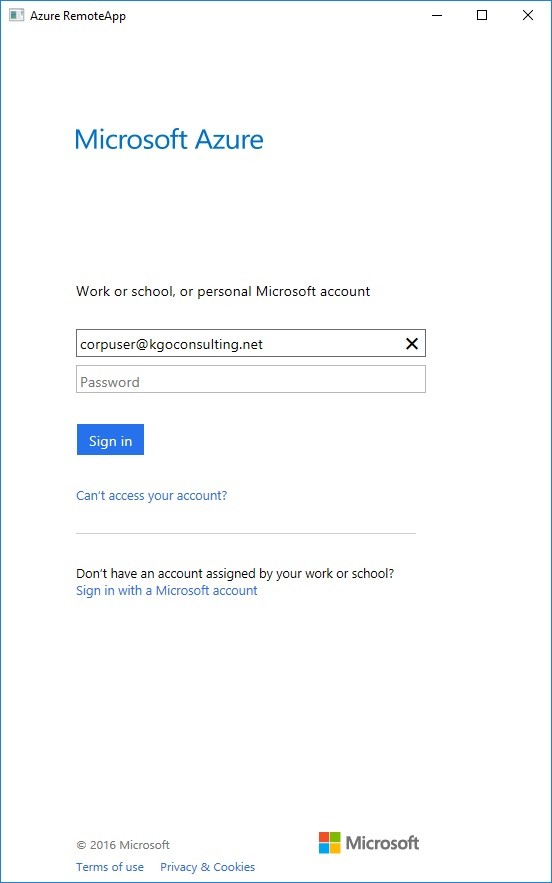
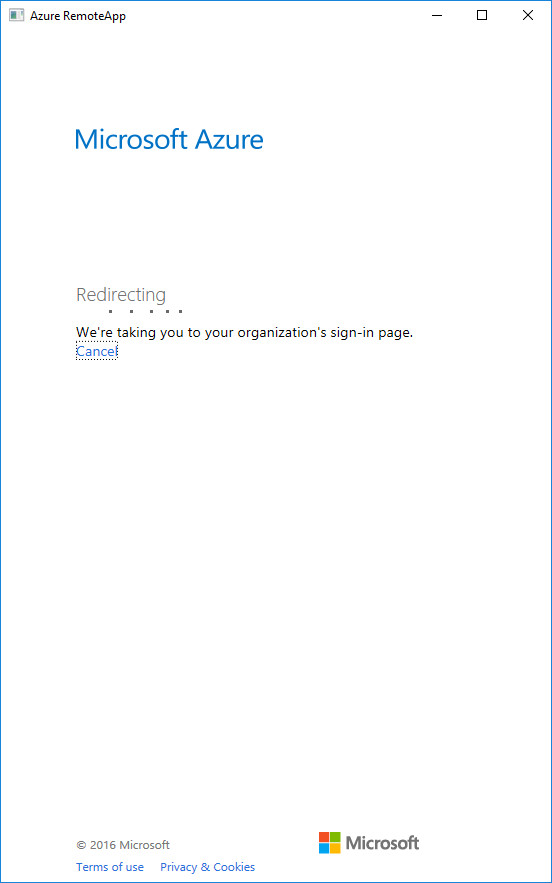
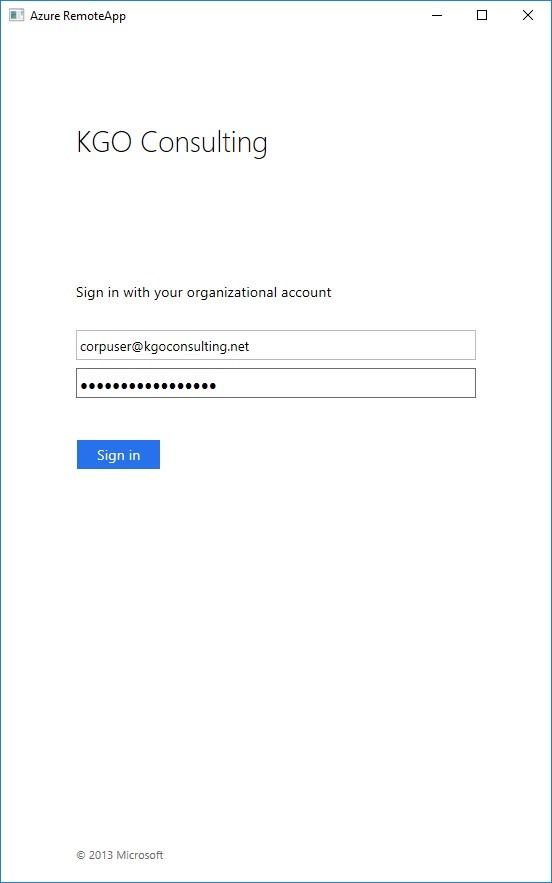
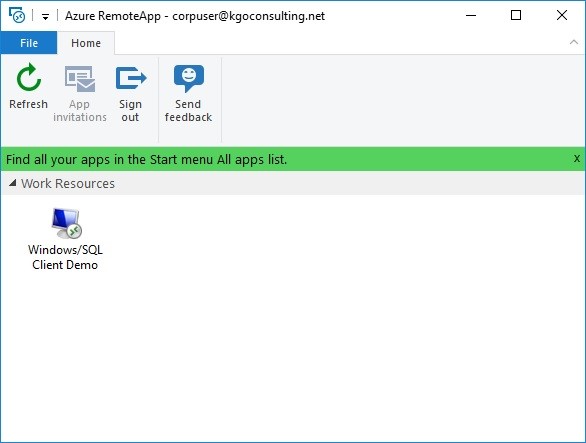
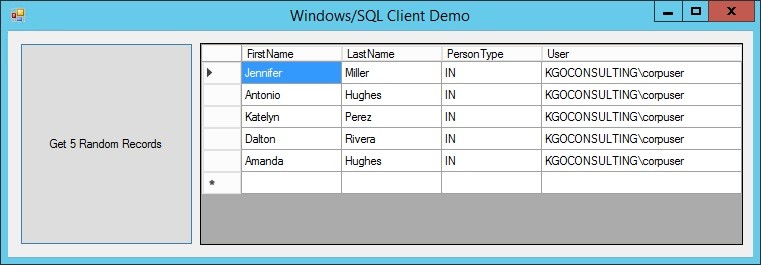
As you can see, it’s all pretty seamless, and it will work on almost any common platform (Windows, IOS, and Android).
Now let’s discuss what is required to set this up. For the purposes of this article, I’m going to assume that Active Directory, Active Directory Federated Services, and a Web Application Proxy are already setup and functioning. If you’re making this in a test environment I highly recommend you go and buy a cheap SSL certificate. Initially, I used a self-signed certificate. It did work, but I had to manually import the certificate into the trusted authorities of every device. It was worth the $8 to avoid this issue. Also, remember to put your virtual machines on the same virtual network.
After the Active Directory infrastructure is setup and functioning, the first thing that needs to be done is to setup the sync between your Active Directory and Azure Active Directory. We do that by installing and running Azure AD Connect on the domain controller. I believe you can install it somewhere else and still make it work just fine, however I wanted to keep the number of VMs to a minimum. Check here for the download: Azure AD Connect Download
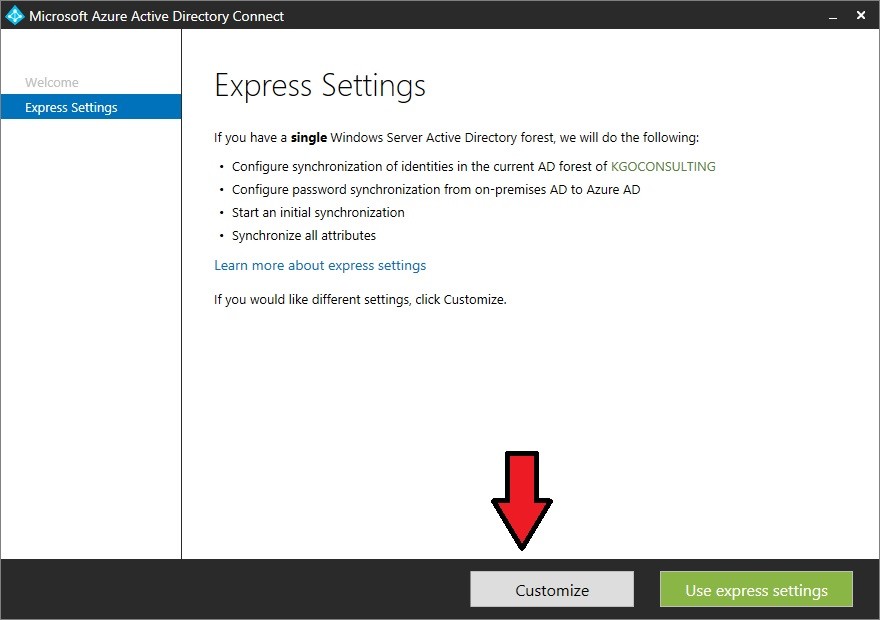
Step 1: Setup and Configure Azure AD Connect
When installing Azure AD Connect make sure you choose “Customize” instead of “Use Express Settings”
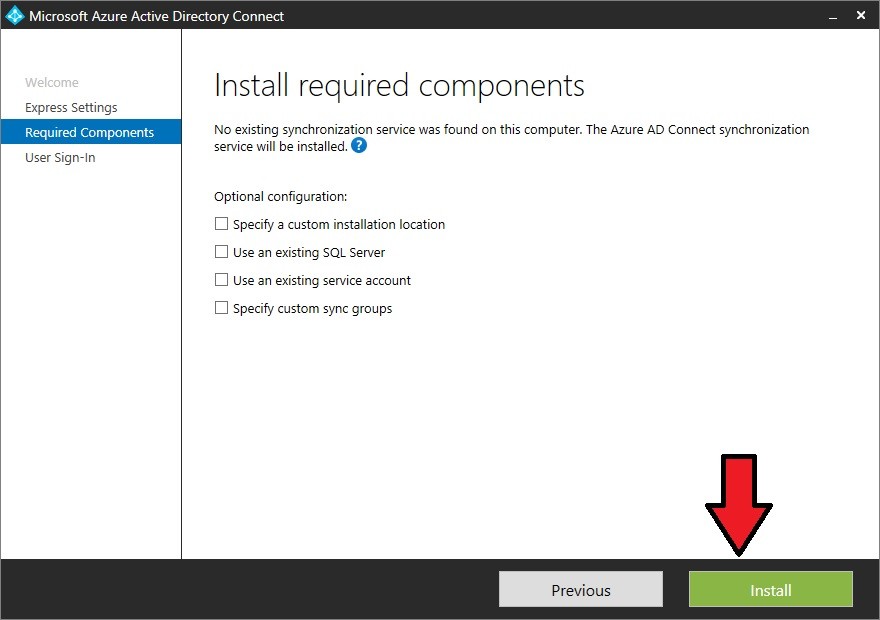
Next there are a few optional installation parameters, you can just click “Install”.
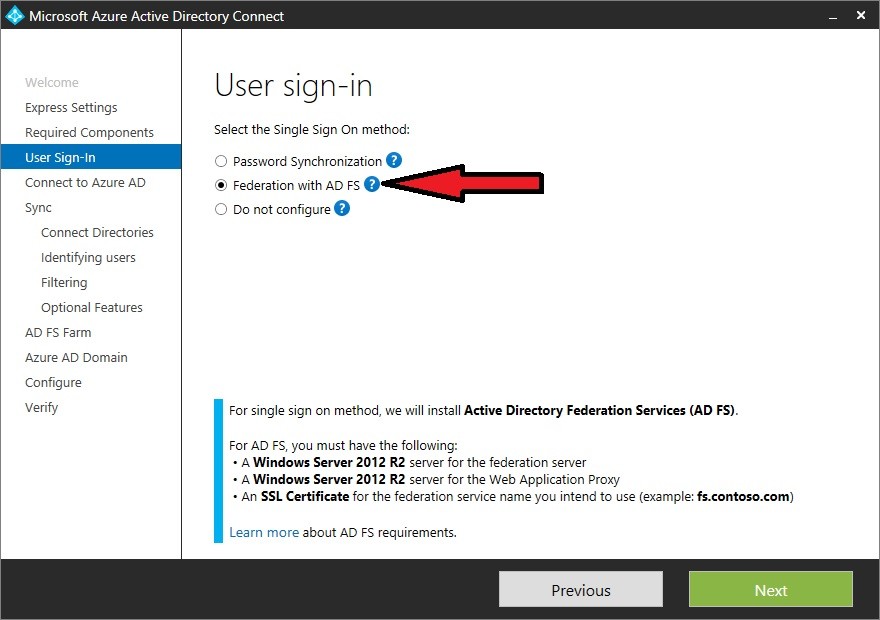
This next part is important. You need to select “Federation with AD FS” before clicking “Next”.
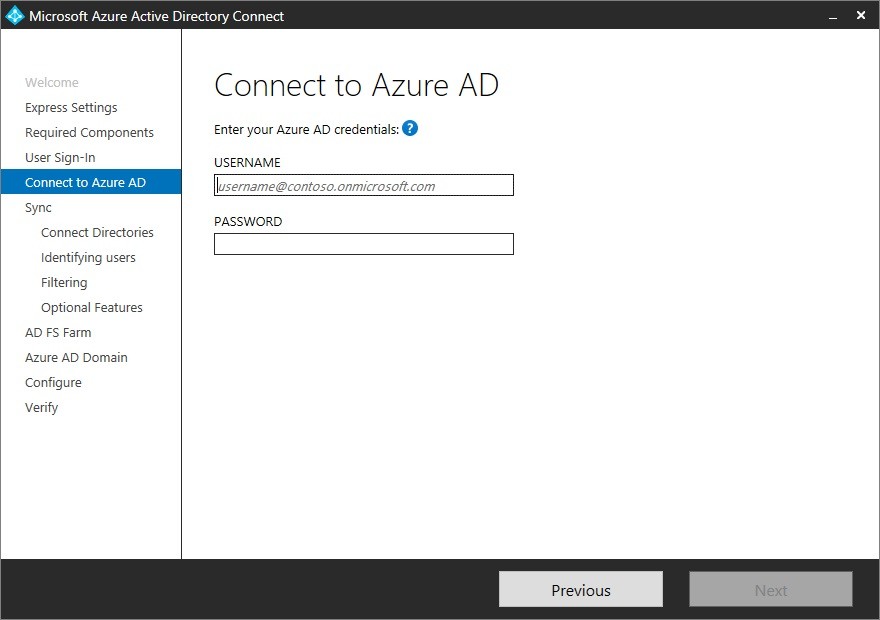
On this page enter an admin account created on Azure AD. This is the account used to make changes to Azure AD. It will probably look something like “XYZAdmin@XYZoutlook.onmicrosoft.com”.
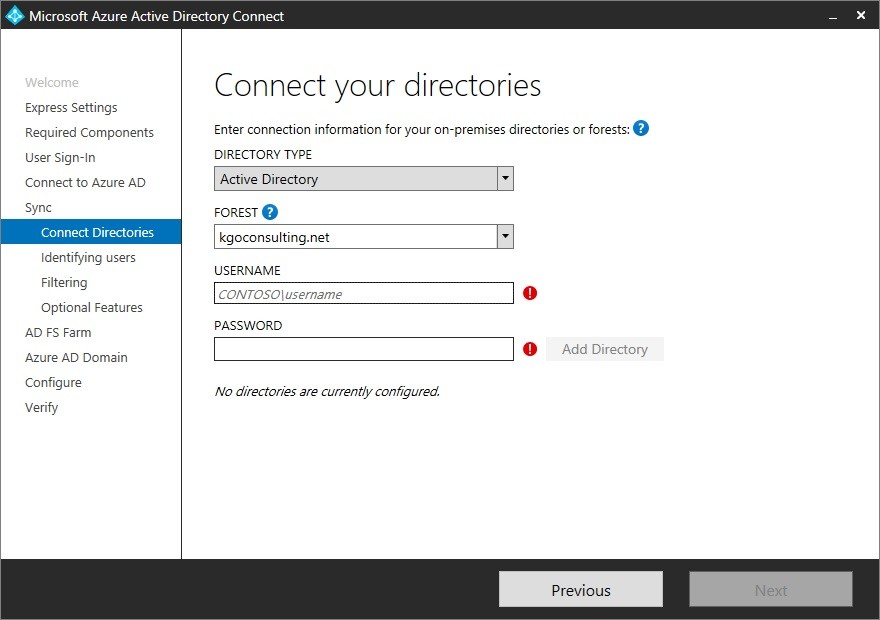
On the next page in the wizard you choose your Active Directory Forest and the service account to be used for syncing.
On the next three pages, you can choose how to uniquely identify users, filter out users, and some optional features like password synchronization. The only part I changed was that I checked “Password Syncronization” and “Password writeback”.
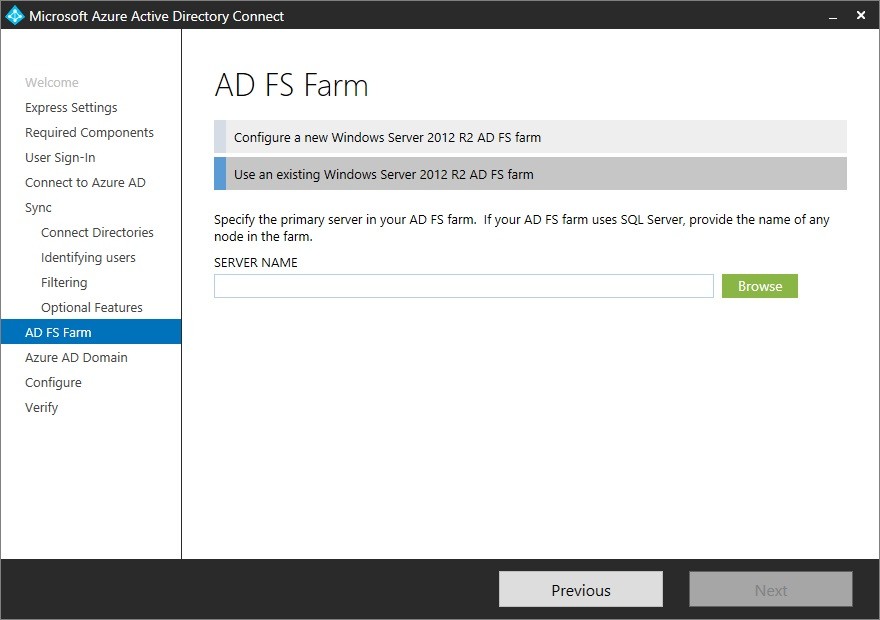
On the page shown below you can choose “Use and existing Windows Server 2012 R2 AD FS farm”. and type in the fully qualified domain name.
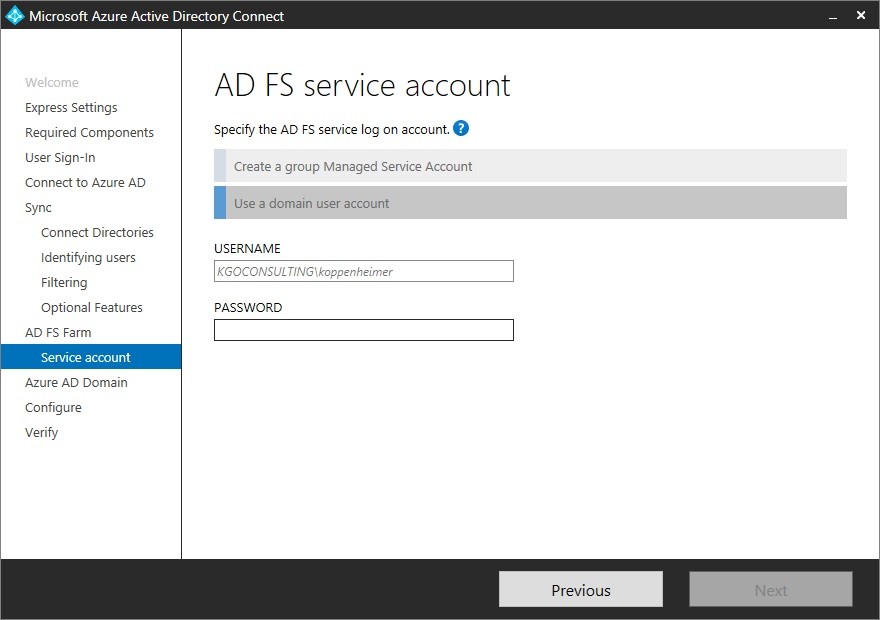
Next we type in the password for our Active Directory service account that was used above. You will not be able to change the username. Alternatively, depending on you Active Directory setup, you may be able to choose “Create a group Managed Service Account”.
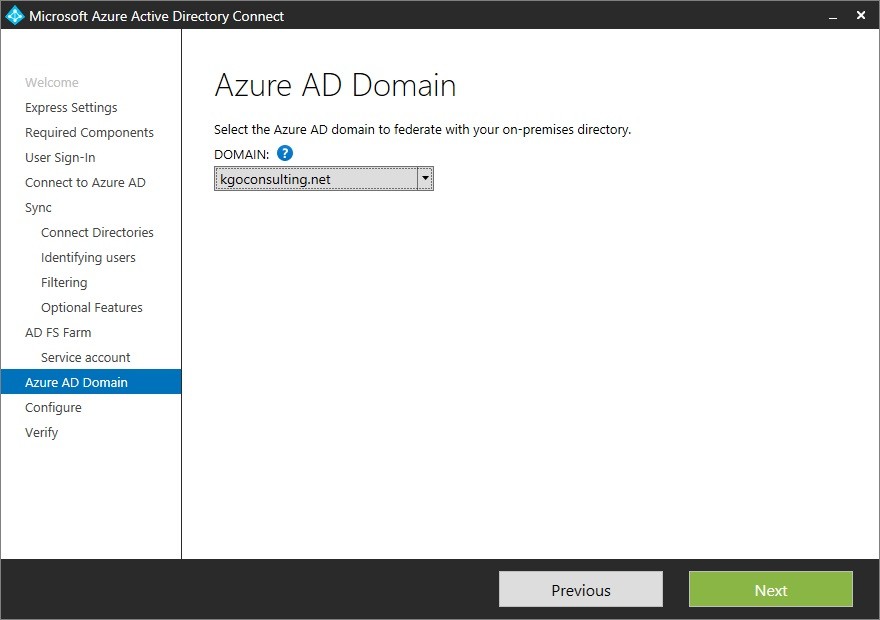
Finally, we choose the domain in Azure AD to federate.
After the page above you just click install.
Now your corporate domain controller is syncing with Azure AD and Azure can use your AD FS/Web Application Proxy Servers.
Step 2: Create a Virtual Machine for Azure RemoteApp to use as a template
Next we will create a virtual machine to use as a template for our RemoteApp server. When creating this virtual machine choose “From Gallery” and choose the image name “Windows Server Remote Desktop Session Host”. There is also a version with Office 365 already installed. Choose that one if you like. After that everything is pretty much standard.
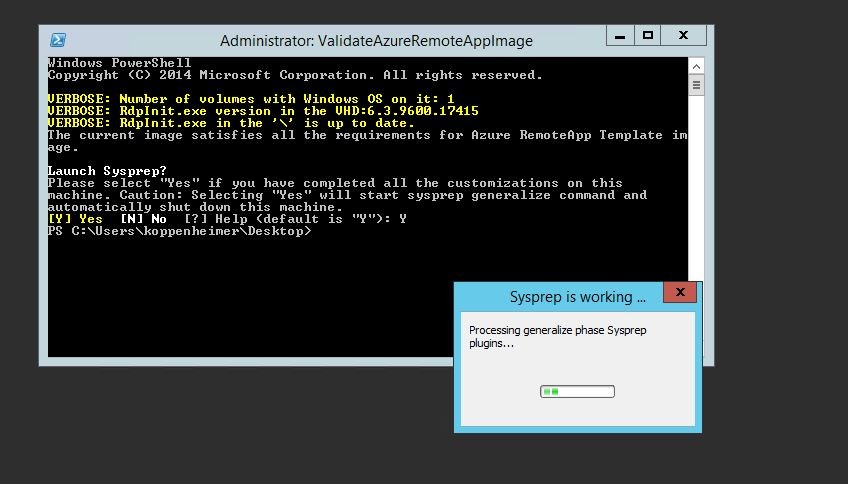
Once the virtual machine is provisioned and running, log into it and install whatever software you want. You may want to join it to the domain so you can fully test the software. I also suggest that you write down the path to the applications you installed. That will come in handy later. One final tip on creating this VM, create another local account with administrator privileges. This will allow us to make changes to the final RemoteApp virtual machine whithout redeploying an image. Once everything is functioning as you want it to, you need to double click on the icon (Validate Azure RemoteApp template Image) at the top left corner of the screen. If everything is ok it will ask you if you want to launch sysprep and press “Y”. It will generalize the machine and shut it down.
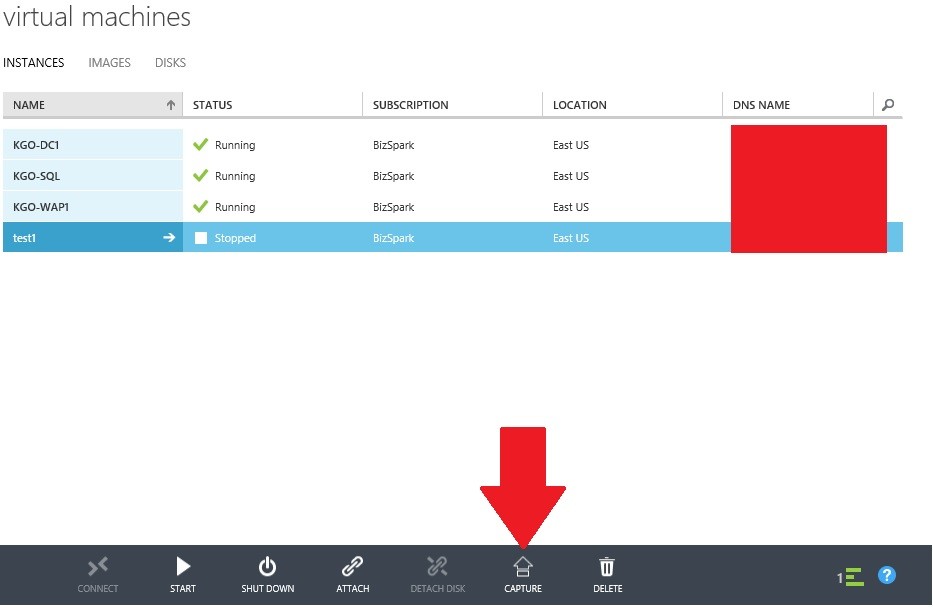
After the machine has shutdown, go back to the Azure portal (virtual machines section). Click on the VM you just finished with. You can click on any of the middle three columns. Once highlighted click capture at the bottom.
Give it a proper name and description, check the check box, and click the check-mark.
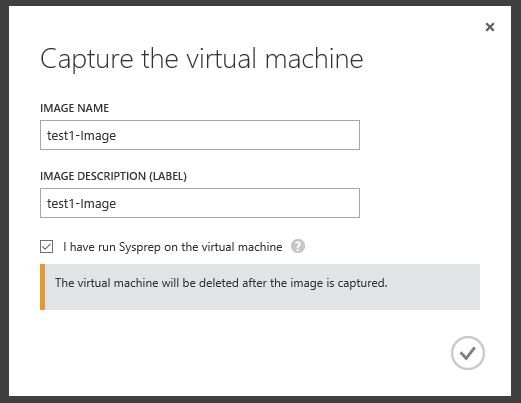
It will now capture the virtual machine image and then delete it. You will see it under “Images” instead of “Instances”.
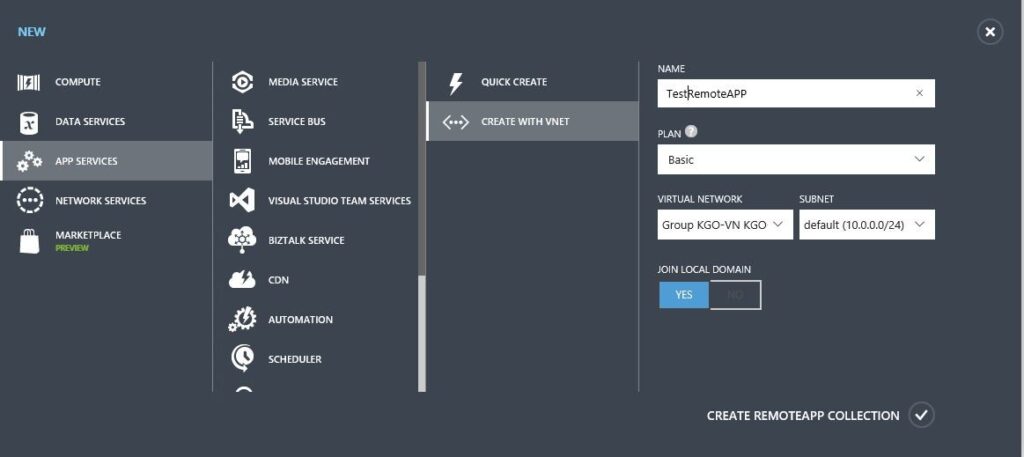
Step 3: Create the RemoteApp Collection
Now go to “REMOTEAPP” in the menu to the left and click “New” at the bottom. In the create menu click “Create With VNET”. Give it a name, choose you VNET, and make sure “Join Local Domain” is “YES”. Then click “Create RemoteApp Collection” at the bottom.
It will quickly create a RemoteApp Collection. The status will be “Input Required”. Click the name and you will see the following.
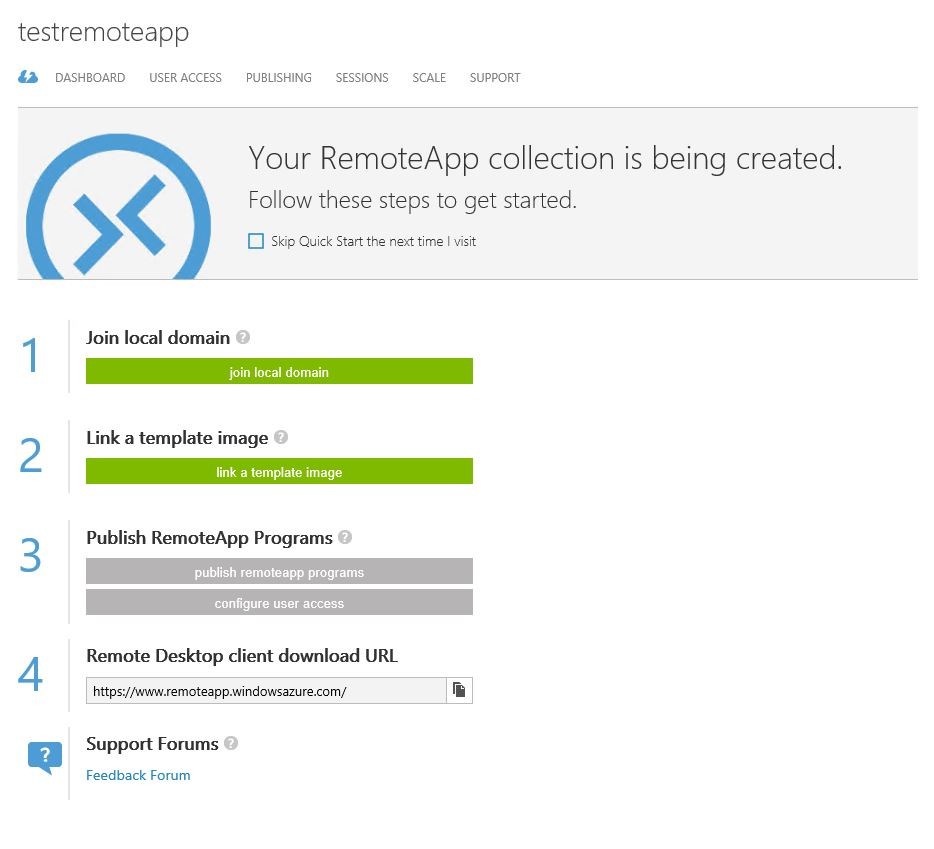
Click “Join local domain” and put in the proper credentials. One little gotcha here, when choosing the administrative account credentials, you must use the following format: username@company.com. If you use company\username it will fail.
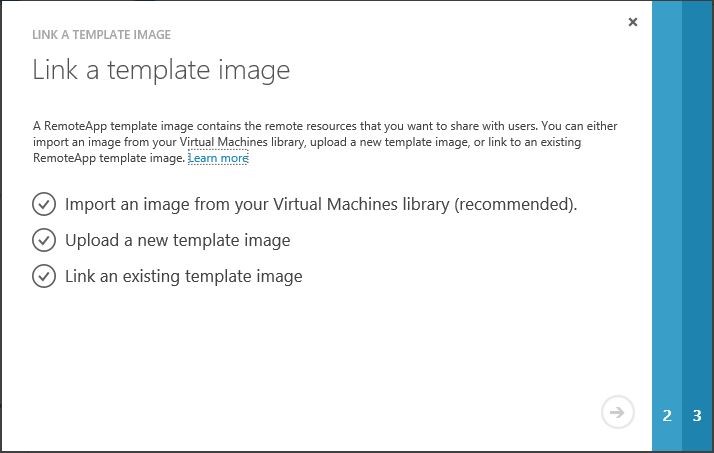
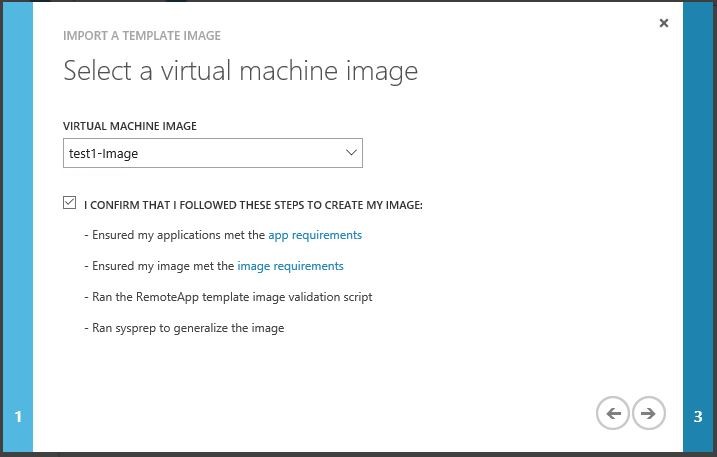
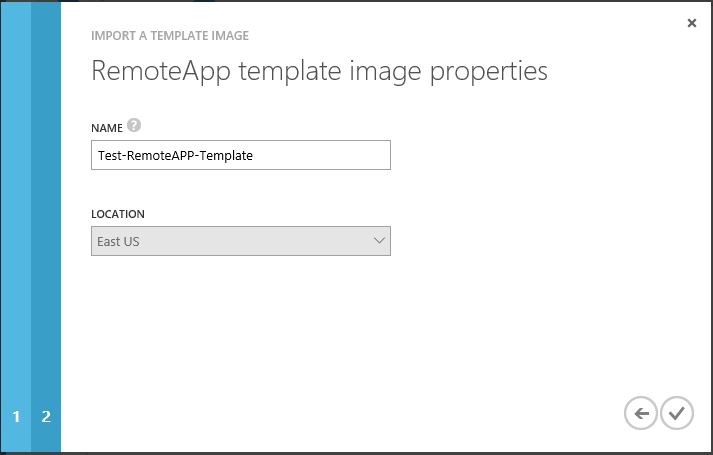
Next click “Link a template image”. This is where we use the template we captured from the virtual machine we created. Select the image we captured from the drop-down box, check the box, and click the next arrow. Finally, we give the template we’re about to import a name. Click the final check mark.
You now will wait while it provisions. I tried it a few times and I had to wait at least 45 minutes each time. Go have lunch or dinner and hopefully it will be done when you get back. The worst part is that it still says “Input Required” as the status, so it’s hard to tell when it’s done.
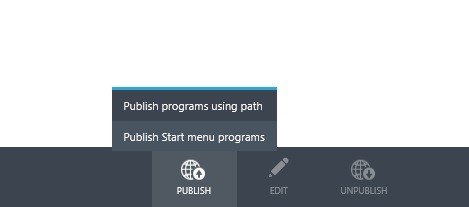
Once it is full provisioned, you will be able to publish an application. Go to “REMOTEAPP” in the menu on the left of the portal. Click the name of the RemoteApp collection we just created. Then click “PUBLISHING” at the top. Now we can publish our custom application. We need the path that we wrote down previously. Click “PUBLISH” at the bottom of the page and choose “Publish programs using path”
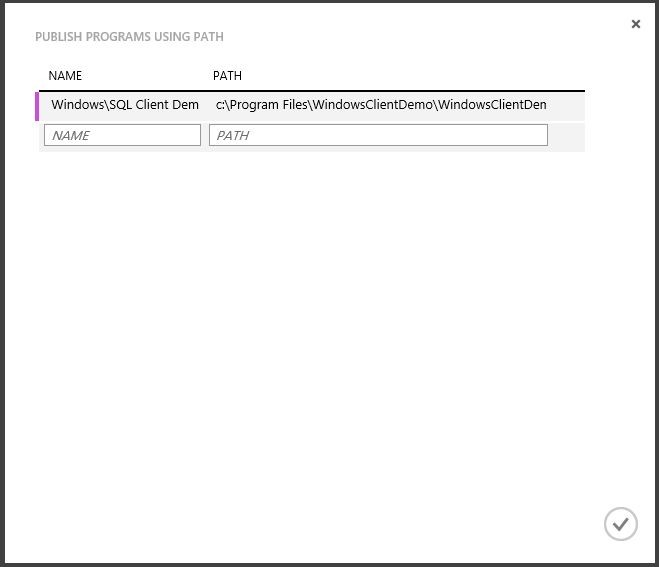
Next we give our app a friendly and put in the path.
Now the app will be published.

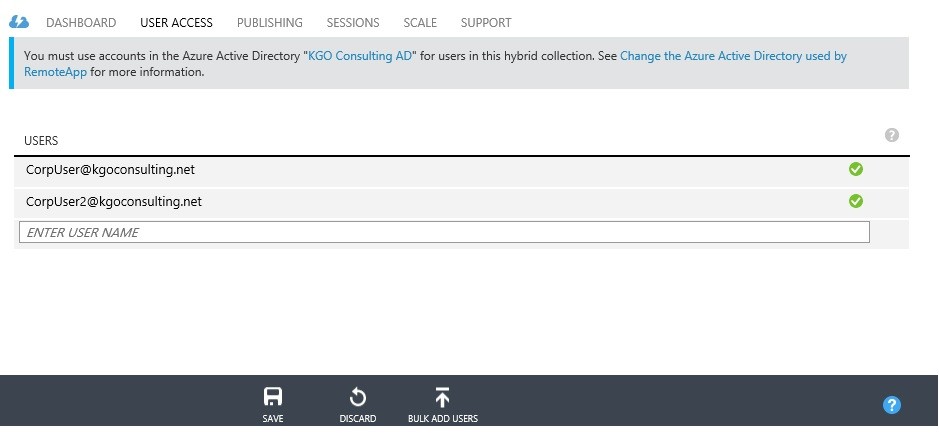
The last part of the setup is to give users access to the RemoteApp server. Click on “USER ACCESS” at the top. Now add users in the following format: Username@Company.com. It will give you a green check-mark if it recognizes the user. Finally, click save at the bottom.
That’s it. Now you should have a fully functional Azure RemoteApp Collection. You can test it out using the process described in the beginning of this article.
One More Tip
Remember that local administrative user we created earlier? We can use it to modify the RemoteApp Server running the collection. You need to publish the command prompt or powershell, plus the remote desktop client on the publishing section of the RemoteApp Collection. You can use the command prompt or powershell to get the machine name. Then use the published remote desktop app to log into the local machine. You will need to log in with machinename\adminusername. From there, you can make modifications easily. I’m sure this is not the recommended method for updating a RemoteApp collection, but it’s quick and easy if you need to do something small.
Update to “One More Tip”
Ok, Now I know why you shouldn’t update your production Azure RemoteApp server directly via remote desktop as shown in the previous paragraph. Azure RemoteApp automatically scales when needed. It adds and removes VMs in the background automatically. You only pay per user, but you could have 10 VMs in the morning and one at night. That’s a really nice feature, however each of those VMs are made from the template. So, if you modify settings on one directly through remote desktop, the others remain unmodified. For testing purposes, it’s probably fine, but for production, you should update the template with an updated captured VM image.
I know this was a long post, but I hope it proves useful and maybe fun to some of you. Feel free to contact me if you have any questions.